
Rubber-band Powered Plane
Aerodynamics, Fabrication, Laser Cutter, CAD (Inventor, AutoCAD), Engineering Drawings, Design Analysis
Conceptualized, designed, CADed, and built a rubber-band powered airplane from balsa wood. Used household materials like saran wrap and coffee stirs in creative ways to create a design that rivaled those of professionally made kits. Placed First in statewide competition.
Problem Description
The goal of this project was to design a rubber-band powered plane for a state competition. The winner of the competition would be the plane with the longest flight time. There were further constraint on the maximum projected area of the wings designed and maximum overall size of the plane. The plane was also required to begin flying by first resting on the ground.
Plane Design
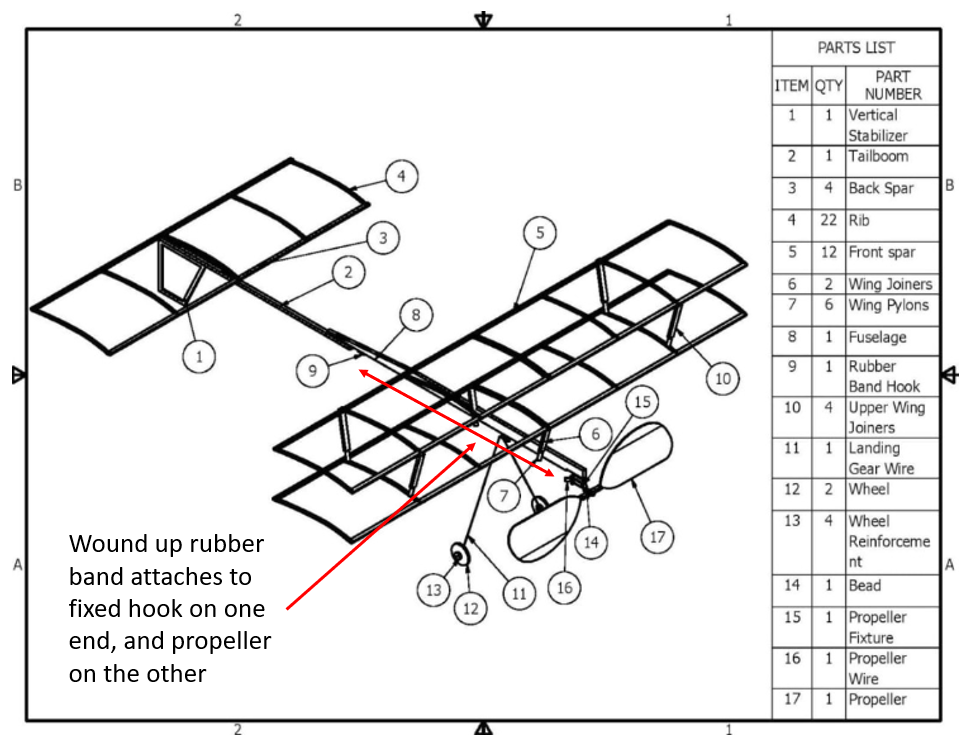
For the initial design of the plane, I built around the rubber-band power mechanism required for the plane. This mechanism works by loading a twisted up rubber band onto a fixed hook on one end and a hook attached to a propeller on the other side. As the rubber band unwinds, it turns the propeller, moving the plane forward.
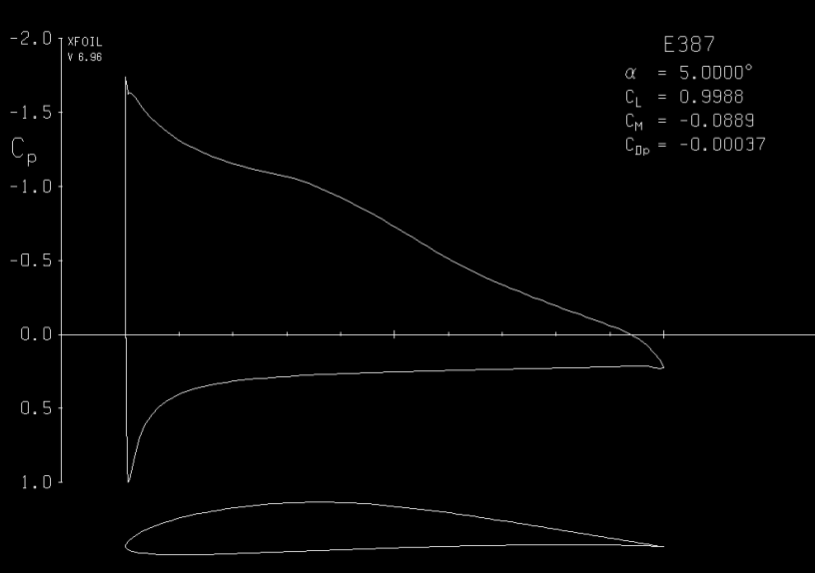
To generate lift, the design of the wings was important to the design of the plane. As the maximum size of the wings was constrained by the competition, the parameter to be optimized for lift was the foil of the wing. I used XFoil, a air foil simulation program to determine a foil shape that yielded the best pressure coefficient and thus lift. I used this profile to design ribs to create the foil of the wing.
Surface area of the wing is proportional to the amount of lift generated. Although the maximum projected area of the wing was constrained by the competition rules, the surface area of the wing could be doubled by stacking two wings on each other while maintaining the same projected area.
To ensure stability of the plane while flying. I also designed a back wing and vertical stabilizer. Since the plane was judged on flight time, to maximize time in the air, the plane must not collide with any walls. Thus the desired fly path is circular. This path can be induced by creating an angle differential between the back and front wings.
As a requirement for the competition was that the plane was to begin resting on the ground, I designed a landing gear such that the plane began resting on the landing gear and vertical stabilizer. This way, the propeller can still rotate freely while the plane is on the ground.
A drawing of the initial design of the plane is shown below.
Fabrication
To build the plane, I had to work around a limited budget and thus needed to be creative when selecting materials. While I had analytically determined the optimal foil of the plane, there were many other parameters of the plane to consider like height of the wings relative to the propeller, height of the wings relative to each other, and angles of the wings. Thus, I chose to optimize these experimentally, and as a result made these parameters adjustable.
Since weight was of primary concern for the flight time of the plane, I selected balsa wood as the main structural material of the plane as it has very low density. I laser cut the components for the wings and tail boom, allowing for very precise shapes which was necessary for the ribs defining the wing foil. For the rest of the wing, a filler material was necessary to prevent air from flowing between the ribs and maintain the pressure differential generating lift. Thus I selected the lightest and thinnest household material I could find: saran wrap.
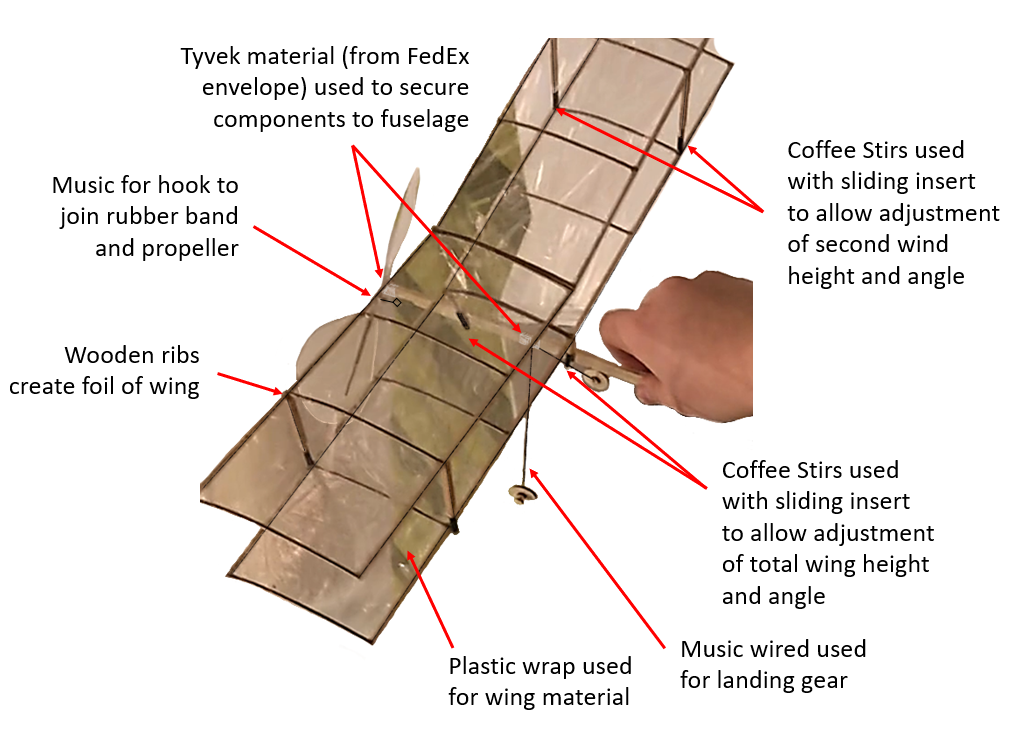
To create the landing gear and hooks for the rubber band, I used music wire as it is light, malleable enough to form into the desired shape, while being rigid enough to maintain it's shape under the forces of the system.
To join these critical components to the balsa wood, I needed a very strong joint as failure would be catastrophic and the wire has very small surface area. Knowing Tyvek is an extremely strong material used in construction, I reused a FedEx envelope made of the material to join the components together.
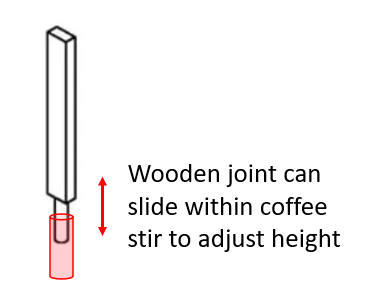
To allow for the adjustability of the wings that was required to optimize the design, I used small pieces of coffee stirs and a sliding wooden piece attached to the wings.
Testing
To optimize the design and lock in the ideal positions for the adjustable components, through experimental testing of the plane was required.
Ultimately, by testing the plane with various parameters, several design modifications were made. Through testing, the optimal wing heights and angle of attack were determined. To ensure these parameters were used going forward, the adjustable components were locked in place using super glue.
Another problem that arose in testing was a pattern of stalling and surging when flying. I hypothesized that the was due to the center of gravity of the plane being too far backward and used a bit of clay to adjust the center of gravity forward. After fine tuning the location and weight of this added mass, this problem was corrected and the plane rose smoothly.